Digital Drive Out
Hardware
AutomatePro features 24 controllable solid-state switches, configurable via software as either 6x PWM-controlled full-bridge drives or 12x half-bridges, or any combination thereof (e.g., 2x half-bridges and 5x full-bridges, or 10x half-bridges and 1x full-bridge). The drive voltage is configurable by setting the two ACTU_PWR pins to the desired voltage source, allowing the user to select the voltage for the downstream actuators. Digital drives are disabled when the E-STOP input is low. This means that when the E-STOP is activated, all digital drive outputs will be disabled until the E-STOP signal is restored.
Connector Pinout
- Connector
- Development Breakout Board
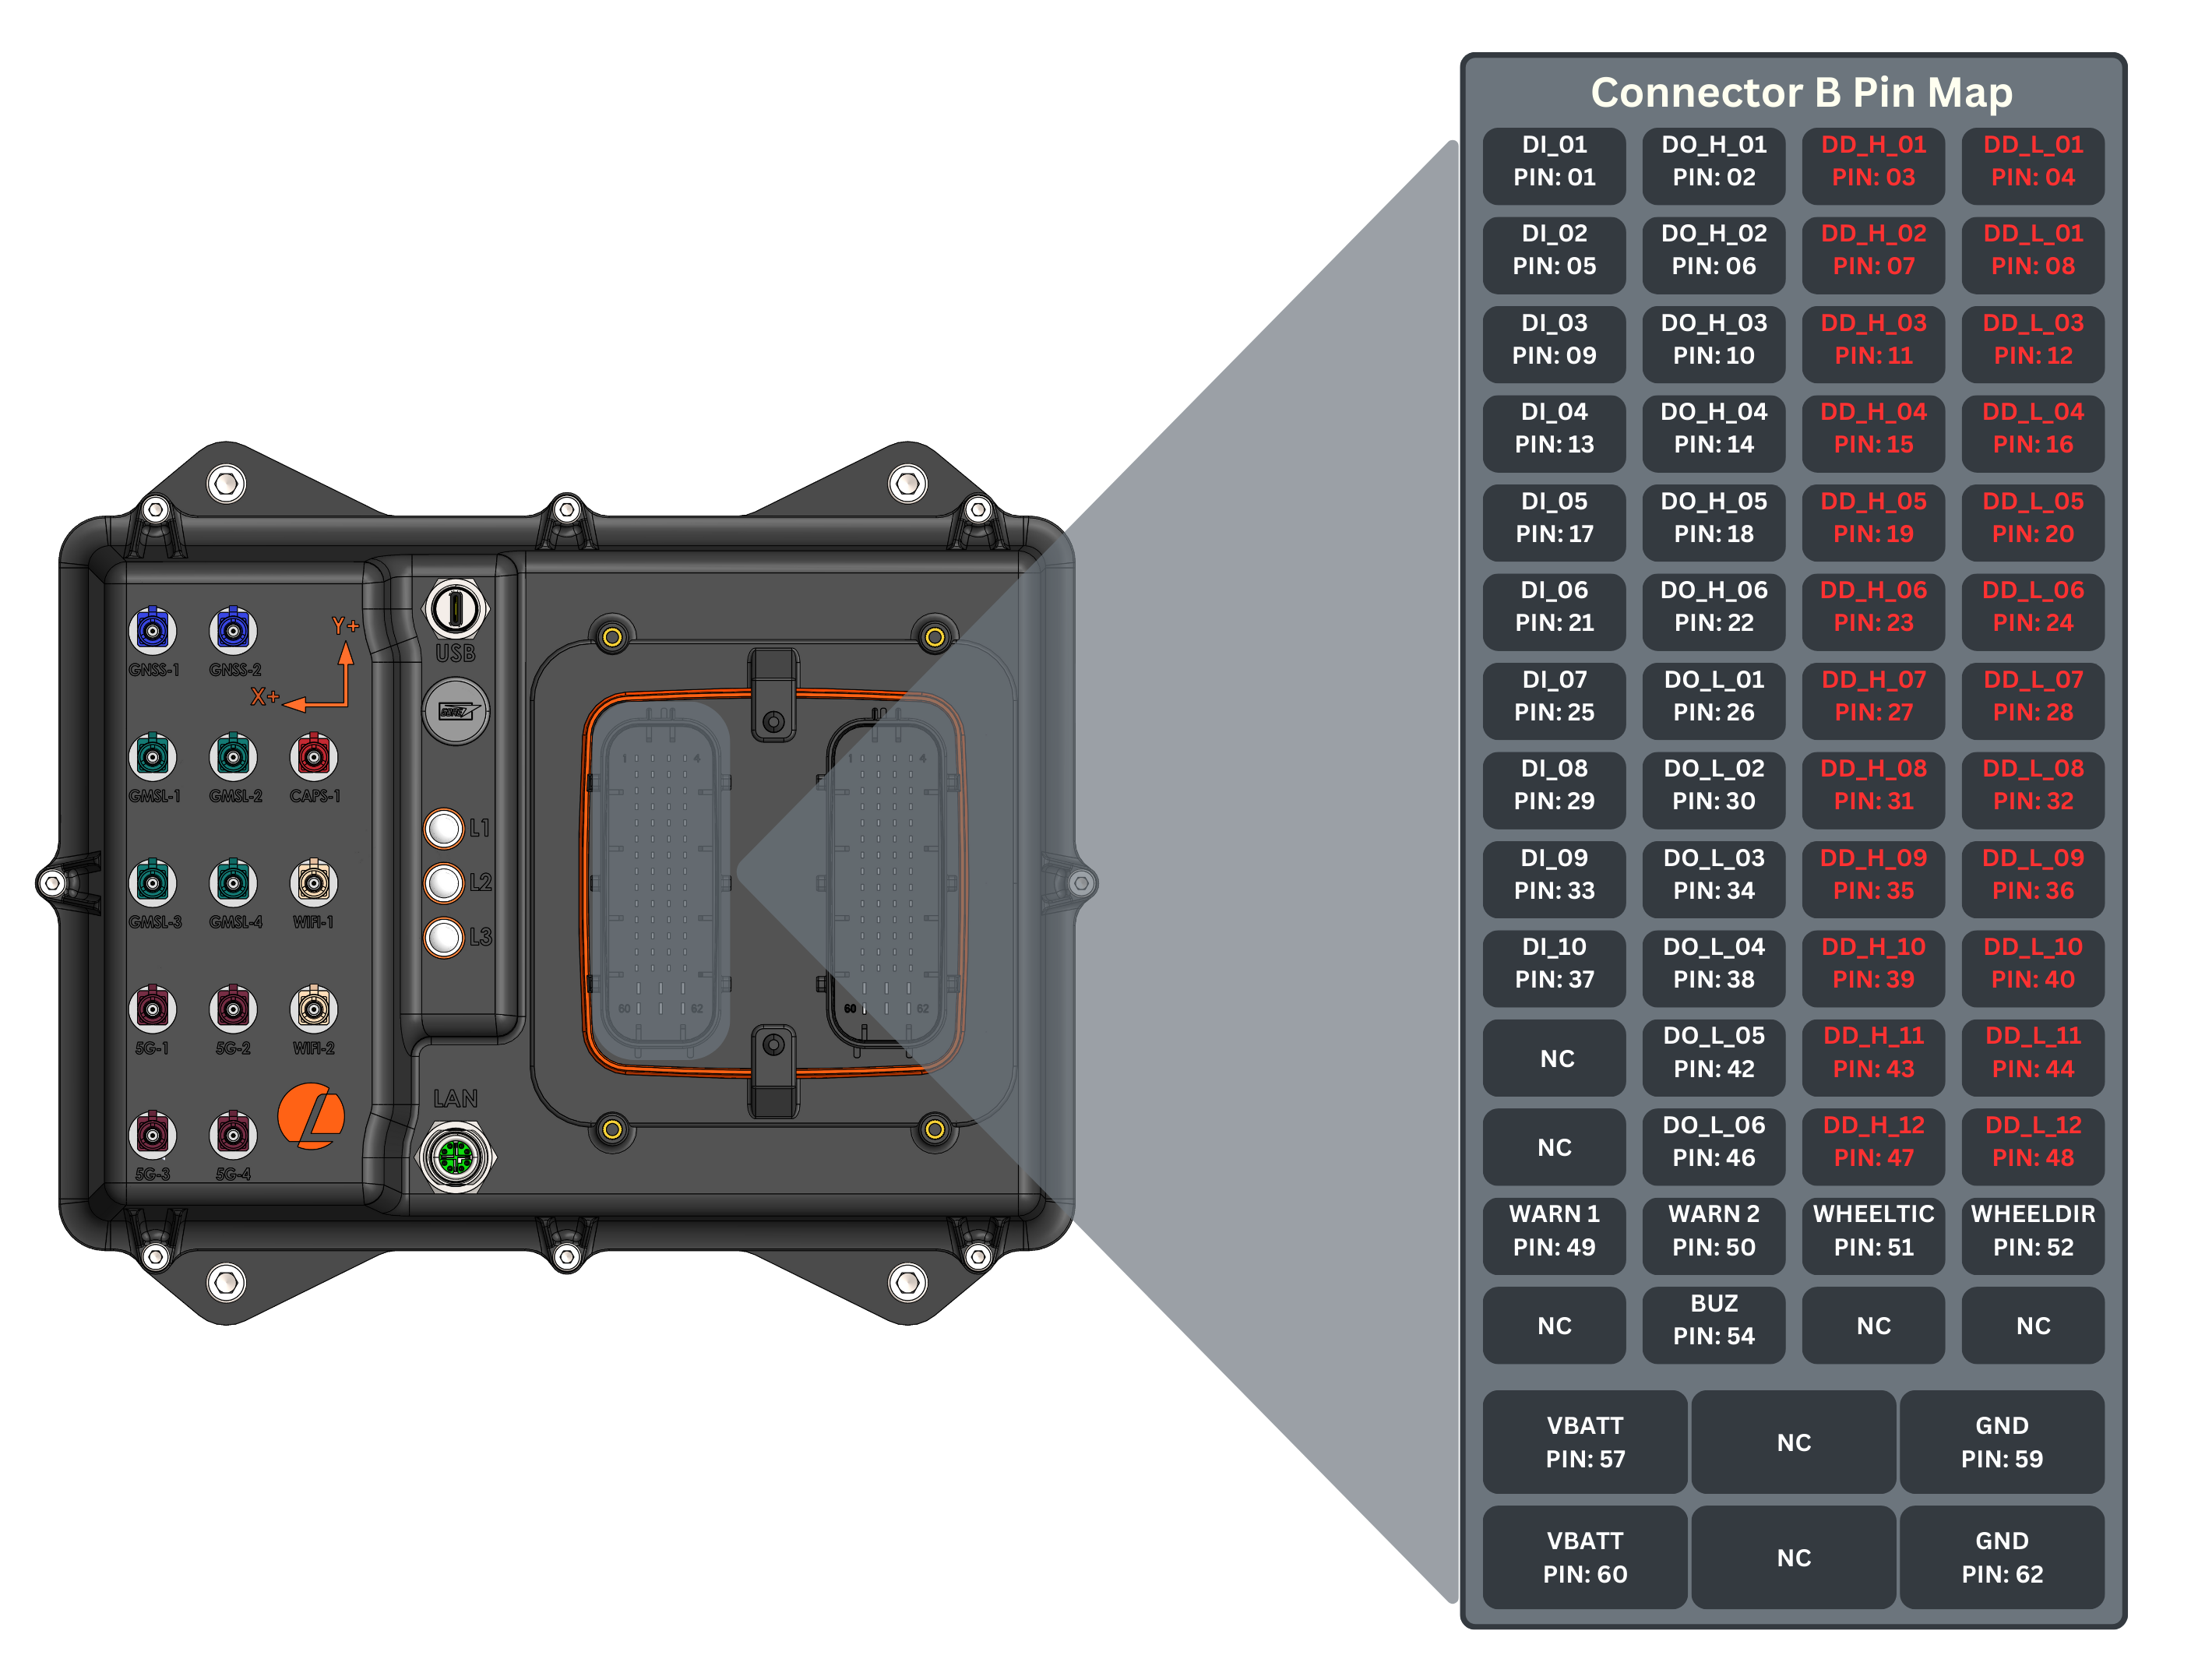
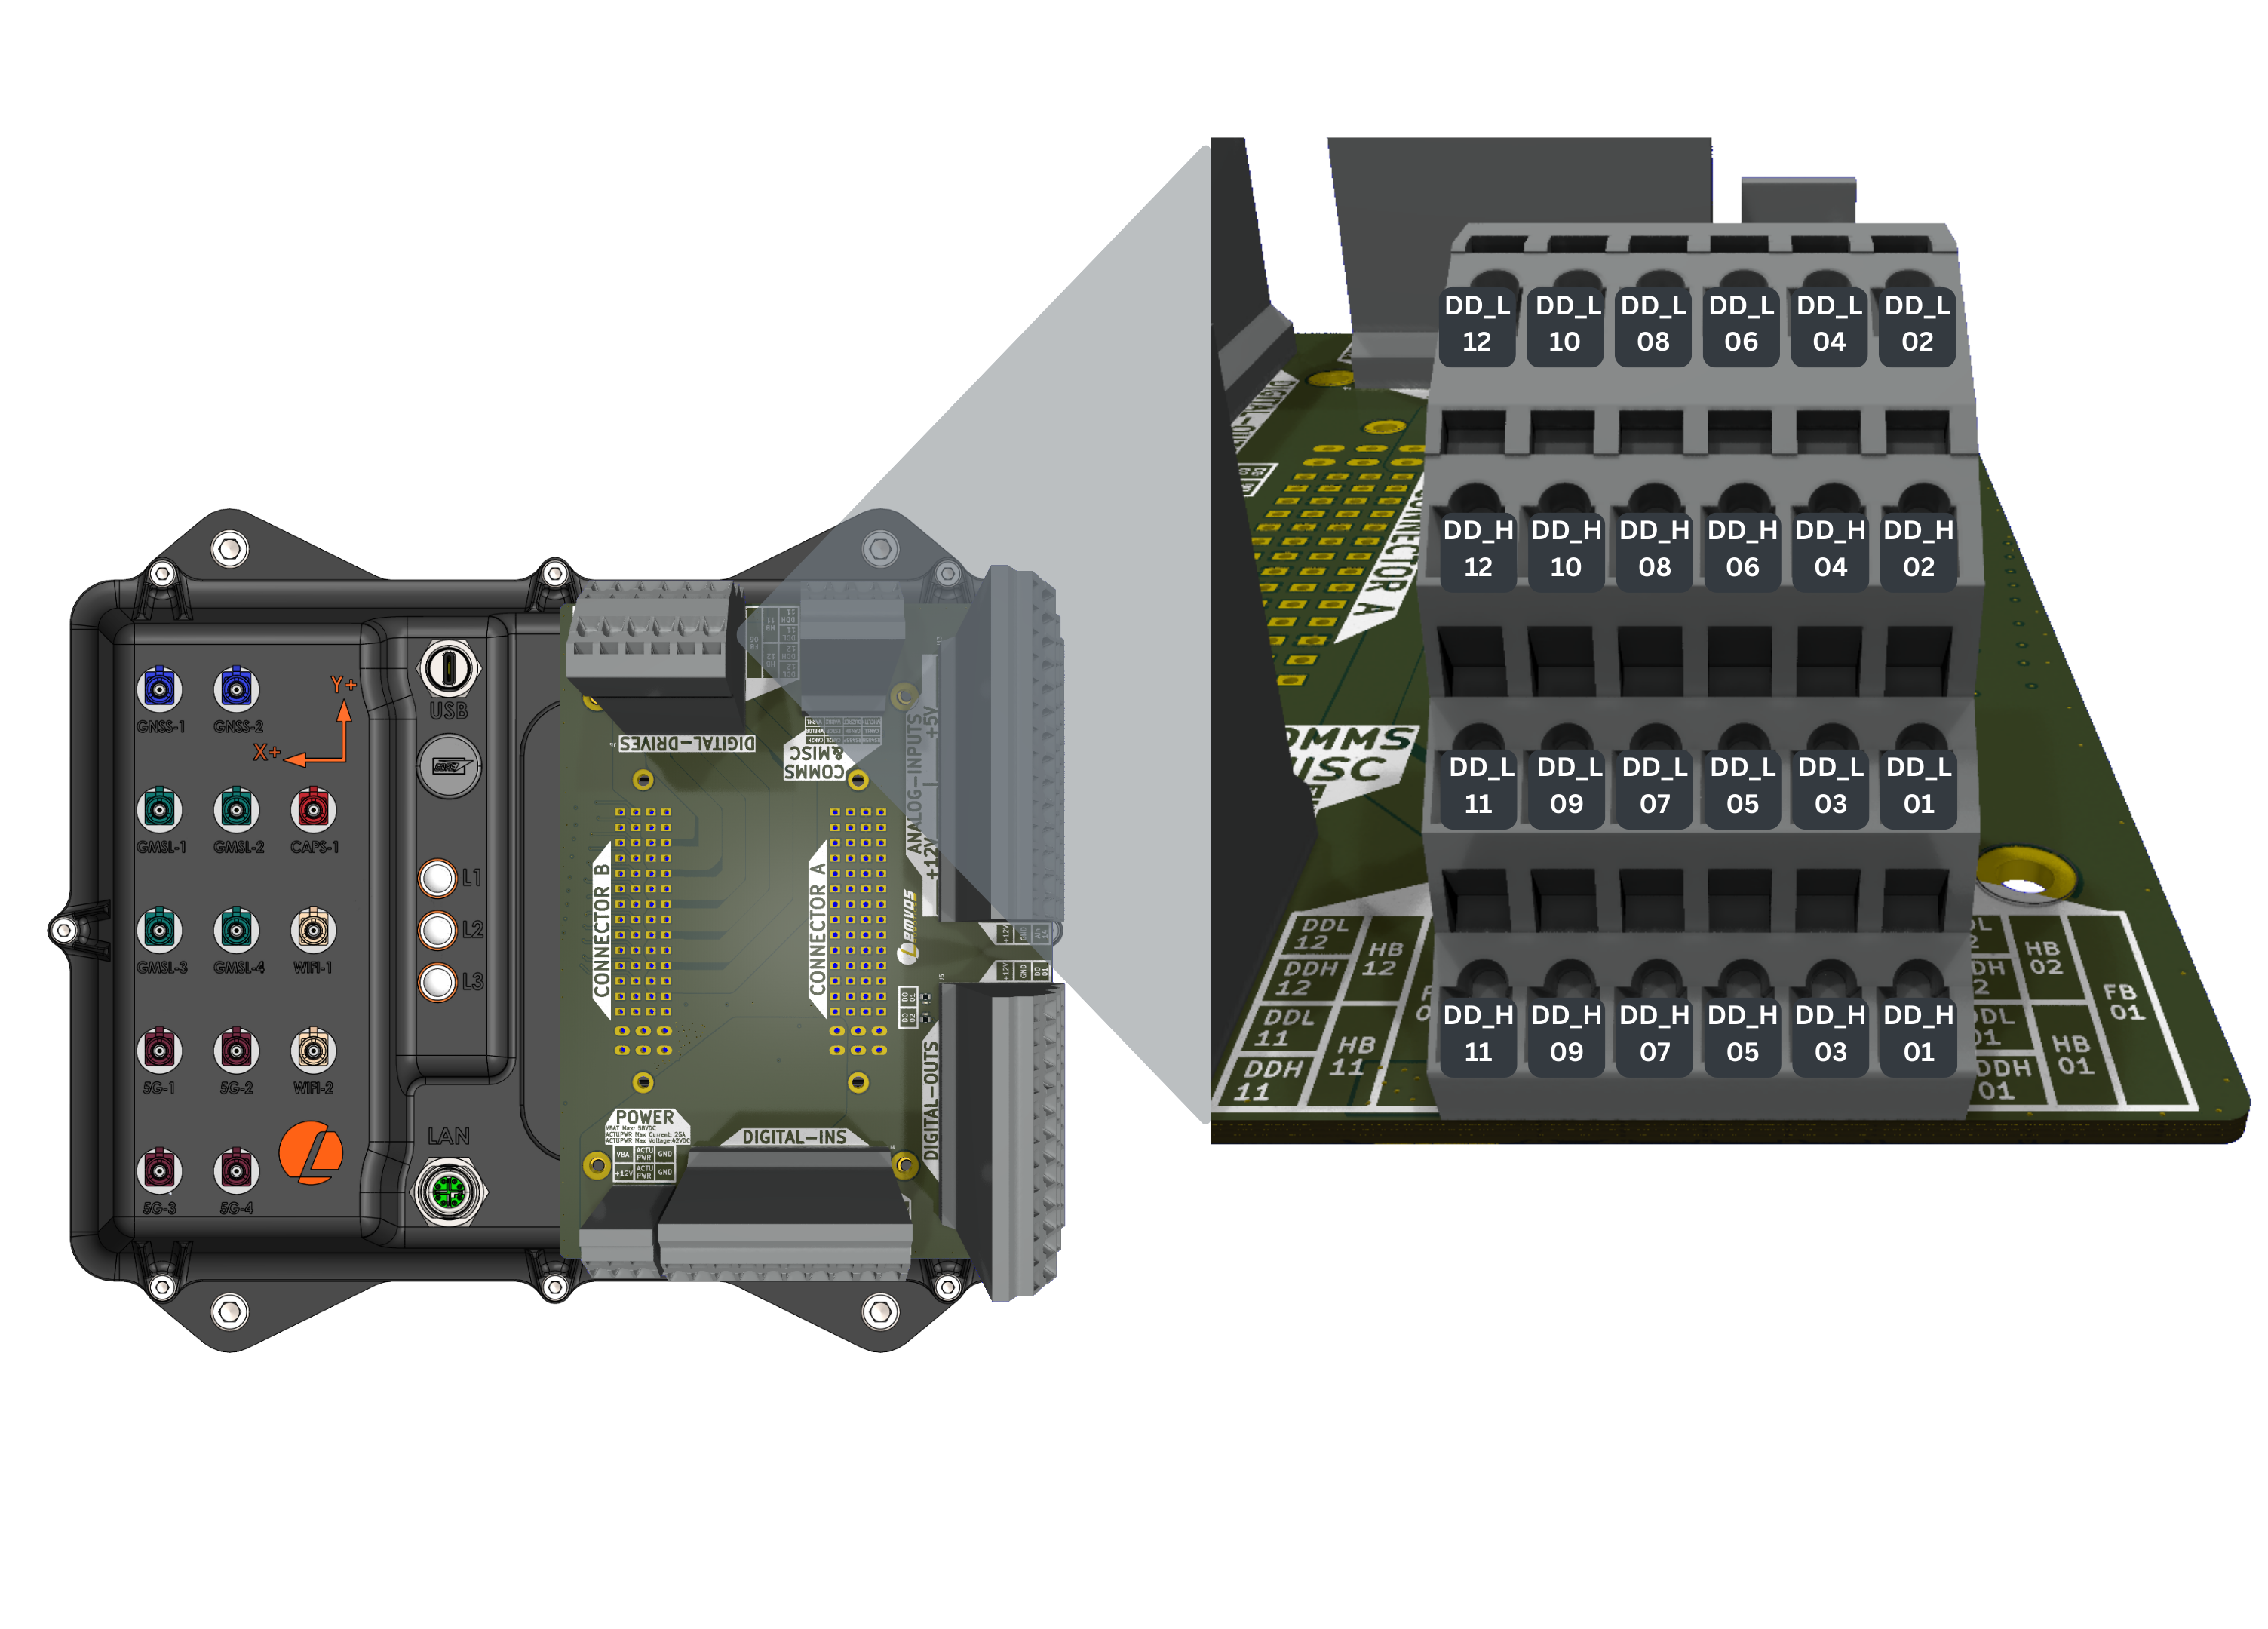
Digital Drive Power
All digital drive outputs are powered via the ACTU_PWR pins (A57 and A60) on Connector A. These pins must be connected to a power supply capable of sourcing the appropriate current for the application, with a voltage range of 6-42 VDC. The voltage bus is distributed across all digital drive outputs, requiring uniform voltage tolerance for all downstream actuators. Each ACTU_PWR pin is rated at 40A, allowing single-pin use if the current remains below 40A. The GND power connections on pins B59 and B62 should match the current rating of the ACTU_PWR pins. The onboard fuses are non-resettable and limited to a maximum of 60A.
The diagram below shows the internal configuration of the Digital Drives.
The breakout board is limited to 40A on ACTU_PWR and should not exceed this.
Digital Drive Full-Bridge Specifications
The digital drives full-bridge can be configured as 6x H-bridges, enabling bidirectional control of up to 6 DC motors. These are PWM-controllable with a 0-100% duty cycle range.
| Parameter | Value |
|---|---|
| Voltage Range (Set by ACTU_PWR) | 6-42V |
| Drive Current Max | 5A |
| PWM controllable | All Outputs FULL_BRIDGE_DRIVE_01 FULL_BRIDGE_DRIVE_02 FULL_BRIDGE_DRIVE_03 FULL_BRIDGE_DRIVE_04 FULL_BRIDGE_DRIVE_05 FULL_BRIDGE_DRIVE_06 |
| PWM Switching Frequency | 15 kHz |
| Number of Full-bridges | 6 |
-
Ensure ACTU_PWR is connected to an external power supply, or wire +12V_IO_OUT (pin A61) to the ACTU_PWR pin to use the onboard 12V supply.
-
Ensure that E-STOP input is high to enable digital drives. You can check this via the AutomatePro LEDs.
Digital Drive Half-Bridge Specifications
The half-bridge allows PWM controllability on all low-side drives. The first 6 high-side switches also offer PWM control, while the remaining 6-12 function as on/off switches only.
| Parameter | Value |
|---|---|
| Voltage Range (Set by ACTU_PWR) | 6-42V |
| Drive Current | 5A |
| PWM controllable | HALF_BRIDGE_DRIVE_01 HALF_BRIDGE_DRIVE_02 HALF_BRIDGE_DRIVE_03 HALF_BRIDGE_DRIVE_04 HALF_BRIDGE_DRIVE_05 HALF_BRIDGE_DRIVE_06 HALF_BRIDGE_DRIVE_07 (only low-side switch) HALF_BRIDGE_DRIVE_08 (only low-side switch) HALF_BRIDGE_DRIVE_09 (only low-side switch) HALF_BRIDGE_DRIVE_10 (only low-side switch) HALF_BRIDGE_DRIVE_11 (only low-side switch) HALF_BRIDGE_DRIVE_12 (only low-side switch) |
| PWM Switching Frequency | 15 kHz |
| Number of Half-bridges | 12 |
-
Ensure ACTU_PWR is connected to an external power supply, or wire +12V_IO_OUT (pin A61) to the ACTU_PWR pin to use the onboard 12V supply.
-
Ensure that E-STOP input is high to enable digital drives. You can check this via the AutomatePro LEDs.
ROS API
Subscribers
| Topic | Type | Description |
|---|---|---|
/io/digital_drive_out | automatepro_interfaces/msg/DigitalDriveOut | Publish the desired digital drive states to this topic. Digital drives can be configured in various ways as described in the Hardware section. Each digital drive output is referred to as FUNCTION_XX, where FUNCTION is the configured mode. Options are FULL_BRIDGE_DRIVE, HALF_BRIDGE_DRIVE, LOW_SIDE_DRIVE, and HIGH_SIDE_DRIVE. XX is the output number; ranges for each mode are listed below. LOW_SIDE_DRIVE and HIGH_SIDE_DRIVE require hardware changes. Please contact support if you want to use them. Inputs: d_drive_pin_id: Data type: uint8 (Use ENUM constants defined in the message definition. DigitalDriveOut.FULL_BRIDGE_DRIVE_XX: 01-06 DigitalDriveOut.HALF_BRIDGE_DRIVE_XX: 01-12 DigitalDriveOut.LOW_SIDE_DRIVE_XX: 01-12 DigitalDriveOut.HIGH_SIDE_DRIVE_XX: 01-12) direction:Data type: bool (Use ENUM constants defined in the message definition. DigitalDriveOut.FORWARD for forward DigitalDriveOut.REVERSE for reverse) duty_cycle_percent: Data type: uint8 Min: 0 in percentage % Max: 100 in percentage %Response rate: 200 ms |
Example
Example code snippets toggle the duty cycle of Digital Drive Out 01 by publishing to the /io/digital_drive_out topic.
The ROS package is available here.
- Python
- C++
import rclpy
from rclpy.node import Node
from automatepro_interfaces.msg import DigitalDriveOut

class DigitalDriveOutPublisher(Node):

    def __init__(self):
        super().__init__('digital_drive_out_publisher')
        self.publisher_ = self.create_publisher(DigitalDriveOut, '/io/digital_drive_out', 10)
        self.timer = self.create_timer(1.0, self.timer_callback)  # 1s
        self.duty_cycle = 0

    def timer_callback(self):
        msg = DigitalDriveOut()
        msg.d_drive_pin_id = DigitalDriveOut.HALF_BRIDGE_DRIVE_01
        msg.direction = DigitalDriveOut.FORWARD
        msg.duty_cycle_percent = self.duty_cycle
        self.publisher_.publish(msg)
        self.get_logger().info(
            'Publishing DigitalDriveOut: d_drive_pin_id=%d, direction=%d, duty_cycle_percent=%d' %
            (msg.d_drive_pin_id, msg.direction, msg.duty_cycle_percent))
        self.duty_cycle = 100 if self.duty_cycle == 0 else 0 # Toggle duty cycle between 0 (ON) and 100 (OFF)

def main(args=None):
    rclpy.init(args=args)
    node = DigitalDriveOutPublisher()
    rclpy.spin(node)
    node.destroy_node()
    rclpy.shutdown()

if __name__ == '__main__':
    main()
Run the node using the following command:
ros2 run automatepro_python_tutorials digital_drive_out_node
#include <rclcpp/rclcpp.hpp>
#include <automatepro_interfaces/msg/digital_drive_out.hpp>

class DigitalDriveOutPublisher : public rclcpp::Node
{
public:
    DigitalDriveOutPublisher()
        : Node("digital_drive_out_publisher"), duty_cycle_(0)
    {
        publisher_ = this->create_publisher<automatepro_interfaces::msg::DigitalDriveOut>("/io/digital_drive_out", 10);
        timer_ = this->create_wall_timer(
            std::chrono::seconds(1),
            std::bind(&DigitalDriveOutPublisher::timer_callback, this));
    }

private:
    void timer_callback()
    {
        auto msg = automatepro_interfaces::msg::DigitalDriveOut();
        msg.d_drive_pin_id = automatepro_interfaces::msg::DigitalDriveOut::HALF_BRIDGE_DRIVE_01;
        msg.direction = automatepro_interfaces::msg::DigitalDriveOut::FORWARD;
        msg.duty_cycle_percent = duty_cycle_;
        publisher_->publish(msg);
        RCLCPP_INFO(this->get_logger(), "Publishing DigitalDriveOut: d_drive_pin_id=%d, direction=%d, duty_cycle_percent=%d",
                    msg.d_drive_pin_id, msg.direction, msg.duty_cycle_percent);
        duty_cycle_ = (duty_cycle_ == 0) ? 100 : 0; // Toggle duty cycle between 0 (ON) and 100 (OFF)
    }

    rclcpp::Publisher<automatepro_interfaces::msg::DigitalDriveOut>::SharedPtr publisher_;
    rclcpp::TimerBase::SharedPtr timer_;
    int duty_cycle_;
};

int main(int argc, char *argv[])
{
    rclcpp::init(argc, argv);
    rclcpp::spin(std::make_shared<DigitalDriveOutPublisher>());
    rclcpp::shutdown();
    return 0;
}
Run the node using the following command:
ros2 run automatepro_cpp_tutorials digital_drive_out_node
A service for changing the pin number and duty cycle would avoid editing the example code.